evo 2t - beta · pdf filemanuale d’istruzioni instruction manual manual de istrucciones...
TRANSCRIPT

MANUALE D’ISTRUZIONIMANUALE D’ISTRUZIONIMANUALE D’ISTRUZIONIMANUALE D’ISTRUZIONIMANUALE D’ISTRUZIONIINSTRUCTION MANUALINSTRUCTION MANUALINSTRUCTION MANUALINSTRUCTION MANUALINSTRUCTION MANUALMANUAL DE ISTRUCCIONESMANUAL DE ISTRUCCIONESMANUAL DE ISTRUCCIONESMANUAL DE ISTRUCCIONESMANUAL DE ISTRUCCIONES
MANUEL D’INSTRUCTIONSMANUEL D’INSTRUCTIONSMANUEL D’INSTRUCTIONSMANUEL D’INSTRUCTIONSMANUEL D’INSTRUCTIONS
EVO 2TEVO 2TEVO 2TEVO 2TEVO 2T125 - 200 - 250 - 290cc - 2009125 - 200 - 250 - 290cc - 2009125 - 200 - 250 - 290cc - 2009125 - 200 - 250 - 290cc - 2009125 - 200 - 250 - 290cc - 2009

39 GB
EVO
Thank you for choosing BETA. Wishing you a lots of good biking!This manual wiIl give you the information you need to use yourmotorcycle correctly and to keep it in excellent condition.
BETAMOTOR S.p.A. reserves the right to change the data and features described inthis manual and to modify its products at any time.
40GB
AAAAATTENTIONTTENTIONTTENTIONTTENTIONTTENTION
After the first training hour, check all the tightenings and in a particular manner:
• Footboard supports• Front and rear brake disks• Wheel rims• Shock absorber bolt• Engine bolts and nuts• Crown
41
IND
EX
GB
SECTION 1: GENERAL INFORMASECTION 1: GENERAL INFORMASECTION 1: GENERAL INFORMASECTION 1: GENERAL INFORMASECTION 1: GENERAL INFORMATIONTIONTIONTIONTIONMain parts ............................................................................................. 44Vehicle identification data................................................................................ 44Instrument panel and controls.......................................................................... 44Technical data .......................................................................................................... 45Electrical diagram .................................................................................................... 46
SECTION 2: OPERASECTION 2: OPERASECTION 2: OPERASECTION 2: OPERASECTION 2: OPERATION AND USETION AND USETION AND USETION AND USETION AND USECheck and maintenance before and after off-road use ............................................... 48Fueling ........................................................................................................... 48Recommended lubricants and liquids .............................................................. 49Breaking in .................................................................................................... 49Startup ........................................................................................................... 50
SECTION 3: MAINTENANCE AND CHECKSSECTION 3: MAINTENANCE AND CHECKSSECTION 3: MAINTENANCE AND CHECKSSECTION 3: MAINTENANCE AND CHECKSSECTION 3: MAINTENANCE AND CHECKSGearbox oil ................................................................................................ 52Brake pump oil ........................................................................................................ 53Clutch pump oil ....................................................................................................... 55Fork oil ................................................................................................................... 56Air filter ................................................................................................................... 58Spark plug ............................................................................................................. 59Generator ............................................................................................................59Front brake .............................................................................................................. 60Rear brake ............................................................................................................... 61Liquid coolant .......................................................................................................... 62Silencer .................................................................................................................... 62Carburettor ............................................................................................................... 63Valve petals ............................................................................................................. 63Rear shock absorber leverage .......................................................................................64Checks after cleaning ............................................................................................... 65Maintenance schedule .............................................................................................. 66
SECTION 4: ADJUSTEMENTSSECTION 4: ADJUSTEMENTSSECTION 4: ADJUSTEMENTSSECTION 4: ADJUSTEMENTSSECTION 4: ADJUSTEMENTSAdjustement of brake ............................................................................................... 68Adjustement of clutch ............................................................................................... 68Adjustement of idling speed ...................................................................................... 69Adjustement of gas clearance ................................................................................... 69Adjustement air ..............................................................................................69Check and adjustement of steering gear..................................................................... 69Tightening the chain ................................................................................................. 70Adjustement of front suspension ................................................................................ 71Adjustement of rear shock absorber .......................................................................... 72
SECTION 5: WHASECTION 5: WHASECTION 5: WHASECTION 5: WHASECTION 5: WHAT TT TT TT TT TO DO IN AN EMERGENCYO DO IN AN EMERGENCYO DO IN AN EMERGENCYO DO IN AN EMERGENCYO DO IN AN EMERGENCYTroubleshooting ........................................................................................................ 74
ALPHABETICAL INDEXALPHABETICAL INDEXALPHABETICAL INDEXALPHABETICAL INDEXALPHABETICAL INDEXIndex ....................................................................................................................... 75

42
43
GEN
ERA
L IN
FOR
MAT
ION
GB
1
SE
CT
IO
N
1
INDEXINDEXINDEXINDEXINDEX
Main parts
Vehicle identification data
Instrument panel and controls
Technical data
Electrical diagram

44
GEN
ERA
L IN
FOR
MAT
ION
GB
1
VEHICLE IDENTIFICAVEHICLE IDENTIFICAVEHICLE IDENTIFICAVEHICLE IDENTIFICAVEHICLE IDENTIFICATION DTION DTION DTION DTION DAAAAATTTTTAAAAA
FFFFFrame identificationrame identificationrame identificationrame identificationrame identificationIdentification data AAAAA are stamped on theright side of the steering gear column.
Motor identificationMotor identificationMotor identificationMotor identificationMotor identificationMotor identification data B B B B B are stampedas indicated in the picture.
INSTRUMENT PINSTRUMENT PINSTRUMENT PINSTRUMENT PINSTRUMENT PANEL ANDANEL ANDANEL ANDANEL ANDANEL ANDCONTROLSCONTROLSCONTROLSCONTROLSCONTROLS
11111 Clutch lever22222 Front brake lever33333 Throttle grip
MAIN PMAIN PMAIN PMAIN PMAIN PARARARARARTSTSTSTSTS1-1-1-1-1-Filter box 2 2 2 2 2-Fuel tank 3- 3- 3- 3- 3-Fuel cap
4-4-4-4-4-Silencer 5- 5- 5- 5- 5-Kick starter

45
GEN
ERA
L IN
FOR
MAT
ION
GB
1

46
GEN
ERA
L IN
FOR
MAT
ION
GB
1 ELECTRICAL DIAELECTRICAL DIAELECTRICAL DIAELECTRICAL DIAELECTRICAL DIAGRAMGRAMGRAMGRAMGRAM

47 GB
2
OPE
RAT
ION
AN
D U
SE
SE
CTIO
N
2
INDEXINDEXINDEXINDEXINDEX
Check and maintenance before and afteroff-road use
Fueling
Recommended lubricants and liquids
Breaking in
Start up

48
OPE
RAT
ION
AN
D U
SE
GB
2 CHECKS AND MAINTENANCE BEFORE AND AFTER OFFCHECKS AND MAINTENANCE BEFORE AND AFTER OFFCHECKS AND MAINTENANCE BEFORE AND AFTER OFFCHECKS AND MAINTENANCE BEFORE AND AFTER OFFCHECKS AND MAINTENANCE BEFORE AND AFTER OFF-RO-RO-RO-RO-ROAD USEAD USEAD USEAD USEAD USE
In order to avoid problems connected to the operation of the vehicle, it is advisableto perform some checking and maintenance operations before and after use. Just afew minutes given to these procedures will save you time and money, and wilI makeriding much safer. Proceed as follows:
TYRES check pressure, general condition and thickness of treadSPOKES check for correct tensionNUTS AND BOLTS check completely all bolts and nutsCHAIN check tension (20 mm play) and grease if necessaryAIR FILTER clean filter and wet with suitable oil for filters
Note:Note:Note:Note:Note:Check that you have the vehicle identification documents.On cold days, warm up the motor by running it at minimum for a few instants beforestarting off. . . . . Wash the vehicle carefully after every off-road use.
FUELINGFUELINGFUELINGFUELINGFUELING
Remove cap AAAAA.
The fuel tank holds approximatelyThe fuel tank holds approximatelyThe fuel tank holds approximatelyThe fuel tank holds approximatelyThe fuel tank holds approximately2,6 liters, 0,5 liter of which is re-2,6 liters, 0,5 liter of which is re-2,6 liters, 0,5 liter of which is re-2,6 liters, 0,5 liter of which is re-2,6 liters, 0,5 liter of which is re-serve.serve.serve.serve.serve.
Use only a mixture of unleaded super fueland oil (mineral oil 4%, synthetic oil 1,5%)

49 GB
2
OPE
RAT
ION
AN
D U
SE
RECOMMENDED LUBRICANTS AND LIQUIDSRECOMMENDED LUBRICANTS AND LIQUIDSRECOMMENDED LUBRICANTS AND LIQUIDSRECOMMENDED LUBRICANTS AND LIQUIDSRECOMMENDED LUBRICANTS AND LIQUIDS
For better operation and longer vehicle life, we advise you to use the products listedin the following chart:
TCUDORPFOEPYT TCUDORPFOEPYT TCUDORPFOEPYT TCUDORPFOEPYT TCUDORPFOEPYT NOITACIFICEPSLACINHCET NOITACIFICEPSLACINHCET NOITACIFICEPSLACINHCET NOITACIFICEPSLACINHCET NOITACIFICEPSLACINHCET
LIONOISSIMSNART 04W02XOBRAEGLHADRAB
ERUTXIMROFLIO TXKABVLHADRAB
LIOHCTULCDNAEKARB 4TODDIULFEKARBLHADRAB
10-GNICAR-JOUSTIMEDI
LIOKROF ro
"5EAS01CM"YARLEB
SDORDNASTNIOJROFESAERG ESAERGDRAOBTUOLHADRAB
TNALOOCDIUQIL TNENAMREPLHADRAB
BREAKING INBREAKING INBREAKING INBREAKING INBREAKING IN
Breaking in takes approximately 10 hours of operation. During this time we suggestto:
•Ride after having well warmed the engine•Avoid travel at constant speed•Change speed often so that the parts wiII break in uniformly and in a shorter time•Avoid turning the throttle more than 3/4 of the way.
WWWWWarning:arning:arning:arning:arning:
•After the first 5 hours of operation, change the gear box oil.•Always use a mixture of unleaded super fuel and oil (mineral oiI 4%, synthetic oil 1,5%).
•After the first off-road use, check all the nuts and bolts.
NONONONONOTETETETETE:::::For substitution, follow attentively the chart.
50
OPE
RAT
ION
AN
D U
SE
GB
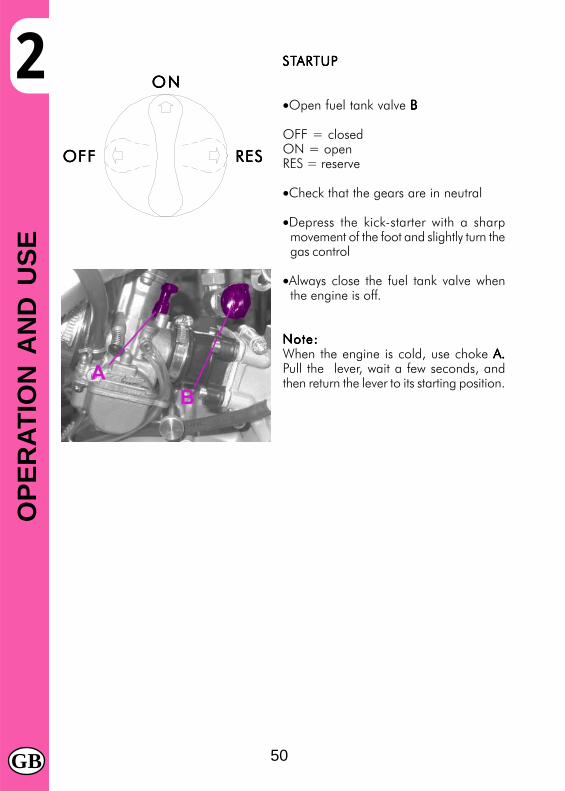
2 STSTSTSTSTARARARARARTUPTUPTUPTUPTUP
•Open fuel tank valve BBBBB
OFF = closedON = openRES = reserve
•Check that the gears are in neutral
•Depress the kick-starter with a sharpmovement of the foot and slightly turn thegas control
•Always close the fuel tank valve whenthe engine is off.
Note:Note:Note:Note:Note:When the engine is cold, use choke A.A.A.A.A.Pull the lever, wait a few seconds, andthen return the lever to its starting position.
OFFOFFOFFOFFOFF
ONONONONON
RESRESRESRESRES

51 GB
3
MA
INTE
NA
NC
E A
ND
CH
ECK
S
SE
CTIO
N
3
INDEXINDEXINDEXINDEXINDEX
Gearbox oil
Brake pump oil
Clutch pump oil
Fork oil
Air filter
Spark plug
Generator
Front brake
Rear brake
Cooling liquid
Silencer
Carburettor
Valve petals
Rear shock absorber Leverage
Checks after cleaning
Maintenance schedule

52
MA
INTE
NA
NC
E A
ND
CH
ECK
S
GB
3 GEARBOX OILGEARBOX OILGEARBOX OILGEARBOX OILGEARBOX OIL
CheckCheckCheckCheckCheckHold the vehicle vertical to the ground.When engine is cold check the oil level bymeans of porthole AAAAA. The oil level mustbe always visible from the porthole.In contrary case restore the oil level throughcap BBBBB.
Oil changeOil changeOil changeOil changeOil changeThe engine must be hot when changingoil:
•Place a container under the engine•Unscrew the filler cap and oiI drain plug
CCCCC•Empty the crankcase completely•Close drain plug CCCCC•Put in the right oil quantity (table on page45)
•Close the filler cap.
Note:Note:Note:Note:Note:Change the gearbox oil after the first 5hours of operation. For all subsequentchanges, follow the instructions given onthe chart on pag. 66, using the Iubricantsrecommended on pag. 49.

53 GB
3
MA
INTE
NA
NC
E A
ND
CH
ECK
S
BRAKE PUMP OILBRAKE PUMP OILBRAKE PUMP OILBRAKE PUMP OILBRAKE PUMP OIL
FFFFFront brakeront brakeront brakeront brakeront brakeCheck the oil level by means of oiI port-hole AAAAA. The oil level must be always vis-ible from the porthole. In contrary case re-store the oil level.To restore the oil level, top up by unscrew-ing the two screws B, B, B, B, B, lifting cap C C C C C andadding oil.
WWWWWarning:arning:arning:arning:arning:lf you feel the lever too soft, there may bean air bubble in the circuit. Apply to yourdealer immediately.
Note:Note:Note:Note:Note:For oil changes, follow the instructionsgiven on the chart on pag. 66, using theIubricants recommended on pag. 49.
Rear brakeRear brakeRear brakeRear brakeRear brakeTo check the oil level remove the rearcover by unscrewing its 5 relevant screws ,then check oil level by means of oil con-tainer EEEEE.Oil level must never be below the minimumlevel mark on container EEEEE. To restore theoil level, top up by means of oil filler cap.

54
MA
INTE
NA
NC
E A
ND
CH
ECK
S
GB
3 Bleeding of front brakeBleeding of front brakeBleeding of front brakeBleeding of front brakeBleeding of front brakeTo bleed air from the front brake circuit,proceed as follows:•Remove the rubber cap AAAAA from valve B B B B B•Open the oiI sump cap•Insert one end of a trasparent tube intovalve B B B B B and the other end into a con-tainer
•Pump with the brake lever 2/3 times andkeep the lever pressed
•Unscrew the valve and let the oil drain•Close the valve and release the lever•If air bubbles are still visible in the tuberepeat above operation until obtaining acontinuous outflow of oil with no air bub-blesNote:Note:Note:Note:Note: During this procedure, continu-ously top up the brake pump tank to re-place the oil that is out flowing
•Remove the tube.•Replace the rubber cap.
Note:Note:Note:Note:Note:Handle the hydraulic oiI very carefully. Itis corrosive, and will irreparably dam-age painted or plastic parts of the mo-torcycle upon contact.
Bleeding of rear brakeBleeding of rear brakeBleeding of rear brakeBleeding of rear brakeBleeding of rear brakeTo bleed air from the rear brake circuit,proceed as follows:•Remove the rubber cap CCCCC from valve D D D D D•Open the oiI sump cap•Insert one end of a trasparent tube intovalve D D D D D and the other end into a con-tainer
•Pump with the brake lever 2/3 times andkeep the lever pressed
•Unscrew the valve and let the oil drain•Close the valve and release the lever•If air bubbles are still visible in the tuberepeat above operation until obtaining acontinuous outflow of oil with no air bub-blesNote:Note:Note:Note:Note: During this procedure, continu-ously top up the brake pump tank to re-place the oil that is out flowing
•Remove the tube.•Replace the rubber cap.

55 GB
3
MA
INTE
NA
NC
E A
ND
CH
ECK
S
CLUTCH PUMP OILCLUTCH PUMP OILCLUTCH PUMP OILCLUTCH PUMP OILCLUTCH PUMP OIL
Check the oil level. The oil level must neverbe below half the tank capacity.To restore the oil level, top up by unscrewingthe two screws AAAAA, lifting cop BBBBB and addingoil.
Note:Note:Note:Note:Note:For oiI changes, follow the instructionsgiven on the chart on pag. 66, using theIubricants recommended on pag. 49
Note:Note:Note:Note:Note:Handle the hydraulic oiI very carefully. Itis corrosive, and will irreparably damagepainted or plastic parts of the motorcycleupon contact.
Bleeding of clutchBleeding of clutchBleeding of clutchBleeding of clutchBleeding of clutchTo bleed air from the clutch circuit, pro-ceed as follows:
•Remove the rubber cap CCCCC from valve D D D D D•Open the oiI sump cap•Insert one end of a trasparent tube intovalve D D D D D and the other end into a con-tainer
•Pump with the cluth lever 2/3 times andkeep the lever pressed
•Unscrew the valve and let the oil drain•Close the valve and release the lever•If air bubbles are still visible in the tuberepeat above operation until obtaining acontinuous outflow of oil with no air bub-blesNote:Note:Note:Note:Note: During this procedure, continu-ously top up the clutch pump tank to re-place the oil that is out flowing
•Remove the tube•Replace the rubber cap.

56
MA
INTE
NA
NC
E A
ND
CH
ECK
S
GB
3 FORK OILFORK OILFORK OILFORK OILFORK OIL
Right shaftRight shaftRight shaftRight shaftRight shaftTo replace the oil, proceed as follows:
1) Remove the front wheel2) Remove the handlebar (see pag.69)3) Loosen left shaft lock screws A A A A A and
take off the slider4) Unscrew upper plug BBBBB5) Unscrew fixing lock nut and take off
the plug6) Unscrew the fixing screw of the
cartridge positioned under the slider,and extract the cartridge
7) Empty the fork leg and the cartridge,draining all the oil inside
8) Reassemble the cartridge on the slidertightening the fixing screw, then refilloil (OJ01) in the cartridge up to thelevel indicated in the figure (with forkin the fully compressed position)
9) Reassemble the plug on the rod, tightenthe lock nut and, extending the forkleg, screw the plug on the shaft
10) Reassemble the fork
60 m
m
Oillevel
Note:Note:Note:Note:Note:For screw A: torque wrench setting7,8 : 9,1 Nm.

57 GB
3
MA
INTE
NA
NC
E A
ND
CH
ECK
S
Left shaftLeft shaftLeft shaftLeft shaftLeft shaftTo replace the oil, proceed as follows:
1) Remove the front wheel2) Remove the handlebar (see pag. 69)3) Loosen the shaft lock screws AAAAA4) Unscrew slider plug BBBBB5) Remove the spring and totally empty
the oil6) Fill oil up to the level indicated in
figure (with fork compressed in the fullycompressed posistion)
7) Reassemble the spring and extend forkleg
8) Screw the plug B
Note:Note:Note:Note:Note:For all changes, follow the instructionsgiven on the chart on pag. 66, using theIubricants recommended on pag. 49.Check regularly and clean thoroughlyremoving any dirt on dust cover and alsocheck the rubber seal to ensure a goodseal.
Note:Note:Note:Note:Note:For screw A: torque wrench setting7,8 : 9,1 Nm.
Oillevel
120
mm

58
MA
INTE
NA
NC
E A
ND
CH
ECK
S
GB
3 AIR FILAIR FILAIR FILAIR FILAIR FILTERTERTERTERTER
To access the filter remove the mudguardby unscrewing the 5 screws AAAAA, and thenproceed as follows:•Remove the rear mudguard detaching thecable of the tail lamp
•Remove filter capping and filter unscrew-ing the 2 screws BBBBB
•Wash the filter with water and soap•Dry the filter•Wet the filter with filter oil, removing anyexcess oil so that there is no dripping
•If necessary, clean the inside of the filterbox
•Reassemble. We suggest to assemblepreviously the filter capping on filter .
Note:Note:Note:Note:Note:•If the filter is very dirty, wash it first withgasoline and then with water andshampoo.
•lf the filter is damaged, replace itimmediately.
WWWWWarning:arning:arning:arning:arning:After every intervention, check thatnothing has been left inside the filter box.
Clean the fi l ter every t ime theClean the fi l ter every t ime theClean the fi l ter every t ime theClean the fi l ter every t ime theClean the fi l ter every t ime thevehicle is used crossvehicle is used crossvehicle is used crossvehicle is used crossvehicle is used cross-----countrycountrycountrycountrycountry.....

59 GB
3
MA
INTE
NA
NC
E A
ND
CH
ECK
S
SPSPSPSPSPARK PLARK PLARK PLARK PLARK PLUGUGUGUGUG
Keeping the spark plug in good condition reduce fuel consumption and increaseengine performance.
To perform the check, simply slide off the electrical connection tube and unscrewthe spark plug.Examine the distance between the electrodes with a feeler. This distance should befrom 0.5 to 0.6 mm. If it is not, it may be corrected by bending the earth electrode.
Check as weII that there are no cracks in the insulation or corroded electrodes. Ifso, replace immediately.
Observe the chart on page 66 when performing the check.Observe the chart on page 66 when performing the check.Observe the chart on page 66 when performing the check.Observe the chart on page 66 when performing the check.Observe the chart on page 66 when performing the check.
When replacing the spark plug, screw it in by hand until it stops, then tight with awrench.
Note:Note:Note:Note:Note:•The use of Iow-quality oil will cause an increase in carbon deposits. We thereforeadvise the use of BARDHAL KXT oil.
•Always use NGK BR7ES spark plugs.
GENERAGENERAGENERAGENERAGENERATTTTTOR (IGNITION GENERAOR (IGNITION GENERAOR (IGNITION GENERAOR (IGNITION GENERAOR (IGNITION GENERATTTTTOR CHECK)OR CHECK)OR CHECK)OR CHECK)OR CHECK)
Check must be performed with a component temperature of about 20°C.Check can also be performed with the generator mounted on the motor bike or onthe engine.Unplug the black 12 pins connector between the generator and CDI.
Verify with a multimeter that the resistance values among the below indicated pinsare in the prescribed range:
• black- white (Pick-Up) 320 ohm ± 15%• red-blue (capacitor charge) 300 ohm ± 15 %• yellow-brown (services supply) 0,45 ohm ± 20%

60
MA
INTE
NA
NC
E A
ND
CH
ECK
S
GB
3 FRONT BRAKEFRONT BRAKEFRONT BRAKEFRONT BRAKEFRONT BRAKE
CheckCheckCheckCheckCheckTo check the front brake wear, simply ob-serve the caliper from the front, where it ispossible to see the ends of the two pads.These pads should have at Ieast a 2 mmIayer of Iining. If this layer is thinner than 2mm, replace the pads immediately.
Note:Note:Note:Note:Note:Observe the times given on the chart onpag. 66 when performing the check.
ReplacementReplacementReplacementReplacementReplacementTo replace the pads, proceed as follows:•Disassemble the disk cover and thecaliper by unscrewing the two screws AAAAAand loosening the screw BBBBB
•Take off the split pin CCCCC•Unscrew the screw BBBBB•Remove the pads D D D D D and replace them•To reassemble, proceed in the reverse or-der. Apply medium thread-locking(frenafiletti medio) to the screws AAAAA
Note:Note:Note:Note:Note:To avoid braking problems, pay particularattention to the correct reassembly of thesplit pins.
If the brake disk is removed, ap-If the brake disk is removed, ap-If the brake disk is removed, ap-If the brake disk is removed, ap-If the brake disk is removed, ap-ply medium thread-lockingply medium thread-lockingply medium thread-lockingply medium thread-lockingply medium thread-locking to theto theto theto theto thescrews when reassembling.screws when reassembling.screws when reassembling.screws when reassembling.screws when reassembling.
61 GB
3
MA
INTE
NA
NC
E A
ND
CH
ECK
S
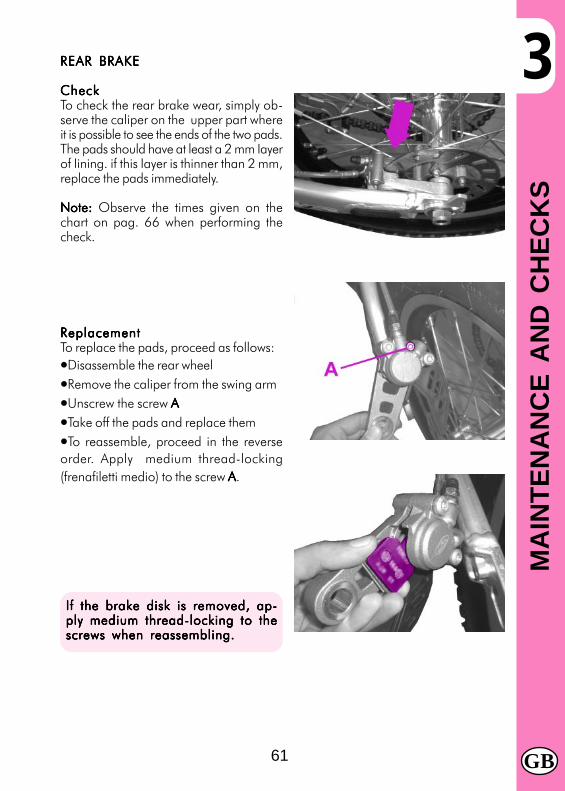
REAR BRAKEREAR BRAKEREAR BRAKEREAR BRAKEREAR BRAKE
CheckCheckCheckCheckCheckTo check the rear brake wear, simply ob-serve the caliper on the upper part whereit is possible to see the ends of the two pads.The pads should have at least a 2 mm Iayerof Iining. if this Iayer is thinner than 2 mm,replace the pads immediately.
Note: Note: Note: Note: Note: Observe the times given on thechart on pag. 66 when performing thecheck.
ReplacementReplacementReplacementReplacementReplacementTo replace the pads, proceed as follows:•Disassemble the rear wheel•Remove the caliper from the swing arm•Unscrew the screw AAAAA•Take off the pads and replace them•To reassemble, proceed in the reverseorder. Apply medium thread-locking(frenafiletti medio) to the screw AAAAA.
If the brake disk is removed, ap-If the brake disk is removed, ap-If the brake disk is removed, ap-If the brake disk is removed, ap-If the brake disk is removed, ap-ply medium thread-locking to theply medium thread-locking to theply medium thread-locking to theply medium thread-locking to theply medium thread-locking to thescrews when reassembling.screws when reassembling.screws when reassembling.screws when reassembling.screws when reassembling.

62
MA
INTE
NA
NC
E A
ND
CH
ECK
S
GB
3 LIQUID COOLANTLIQUID COOLANTLIQUID COOLANTLIQUID COOLANTLIQUID COOLANT
The level check must be performed withthe engine cold, as follows:
•Unscrew cap AAAAA and check the level ofthe liquid
•lf the level is not visible in proximity of thebottom of pipe proceed to add liquid
Circuit capacity is indicated in the tableon pag. 45. Use the liquids recommendedon the table on pag. 49.
WARNING:WARNING:WARNING:WARNING:WARNING:To avoid burns, never unscrew theradiator filler cap when the engine is hot.
SILENCERSILENCERSILENCERSILENCERSILENCER
If an increase in exhaust noise is noted,check the silencer.Proceed as follows:•Unscrew the 3 screws BBBBB•Take off end piece CCCCC•Extract the fiber wool and substitutewith a new other (available as spare-part)
•To reassemble, proceed in the reverseorder.

63 GB
3
MA
INTE
NA
NC
E A
ND
CH
ECK
S
CARBURETTCARBURETTCARBURETTCARBURETTCARBURETTOROROROROR
To ensure excellent carburettor perform-ance, the carburettor must be periodi-cally and thoroughly cleaned.Unscrew plug AAAAA and check that no dirty isinside.Differently it will be necessary to open thetank and to carefully clean the jets.
VVVVVALALALALALVE PETVE PETVE PETVE PETVE PETALSALSALSALSALS
We recommend to check the valve petalsas follows after every 40 hours of use:
•Check that flaps AAAAA show no signs ofbreakage.
•Check that flaps A A A A A close perfectly onvalve body B.B.B.B.B.
64
MA
INTE
NA
NC
E A
ND
CH
ECK
S
GB
3REAR SHOCK ABSORBER LEVERAGEREAR SHOCK ABSORBER LEVERAGEREAR SHOCK ABSORBER LEVERAGEREAR SHOCK ABSORBER LEVERAGEREAR SHOCK ABSORBER LEVERAGE
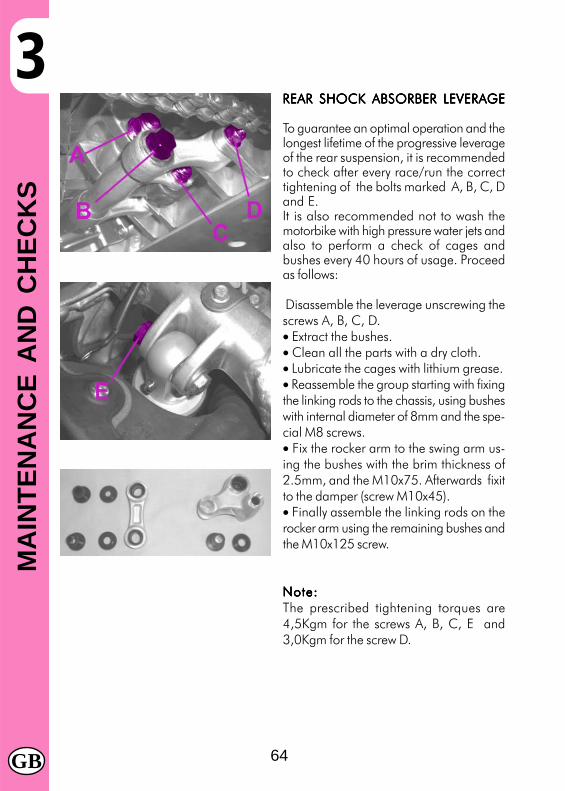
To guarantee an optimal operation and thelongest lifetime of the progressive leverageof the rear suspension, it is recommendedto check after every race/run the correcttightening of the bolts marked A, B, C, Dand E.It is also recommended not to wash themotorbike with high pressure water jets andalso to perform a check of cages andbushes every 40 hours of usage. Proceedas follows:
Disassemble the leverage unscrewing thescrews A, B, C, D.• Extract the bushes.• Clean all the parts with a dry cloth.• Lubricate the cages with lithium grease.• Reassemble the group starting with fixingthe linking rods to the chassis, using busheswith internal diameter of 8mm and the spe-cial M8 screws.• Fix the rocker arm to the swing arm us-ing the bushes with the brim thickness of2.5mm, and the M10x75. Afterwards fixitto the damper (screw M10x45).• Finally assemble the linking rods on therocker arm using the remaining bushes andthe M10x125 screw.
Note:Note:Note:Note:Note:The prescribed tightening torques are4,5Kgm for the screws A, B, C, E and3,0Kgm for the screw D.

65 GB
3
MA
INTE
NA
NC
E A
ND
CH
ECK
S
CHECKS AFTER CLEANINGCHECKS AFTER CLEANINGCHECKS AFTER CLEANINGCHECKS AFTER CLEANINGCHECKS AFTER CLEANING
After cleaning the motorcycle, it is good practice to:
•Clean the air filter (proceed as described on pag.58)•Remove the flywheel cover to eliminate any water that may have entered.•Check carburettor tank: proceed as described on pag.63, to eliminate any waterthat may have entered.
•Grease the chain.
66
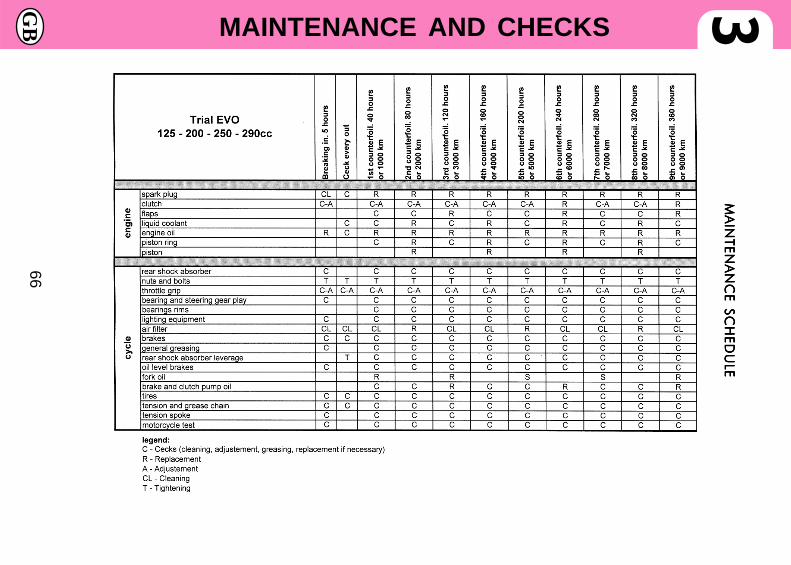
MAINTENANCE AND CHECKS
GB 3
MA
INTEN
AN
CE SC
HED
ULE
MA
INTEN
AN
CE SC
HED
ULE
MA
INTEN
AN
CE SC
HED
ULE
MA
INTEN
AN
CE SC
HED
ULE
MA
INTEN
AN
CE SC
HED
ULE

67 GB
4
AD
JUST
EMEN
TS
SE
CT
IO
N
INDEXINDEXINDEXINDEXINDEX
Adjustment of brakes
Adjustment of clutch
Adjustment of idling speed
Adjustment of gas clearance
Adjustment of air
Check and adjustment of steering gear
Tightening the chain
Adjustment of front suspension
Adjustment of rear shock absorber 4
68
AD
JUST
EMEN
TS
GB
4 ADJUSTMENT OF BRAKESADJUSTMENT OF BRAKESADJUSTMENT OF BRAKESADJUSTMENT OF BRAKESADJUSTMENT OF BRAKES
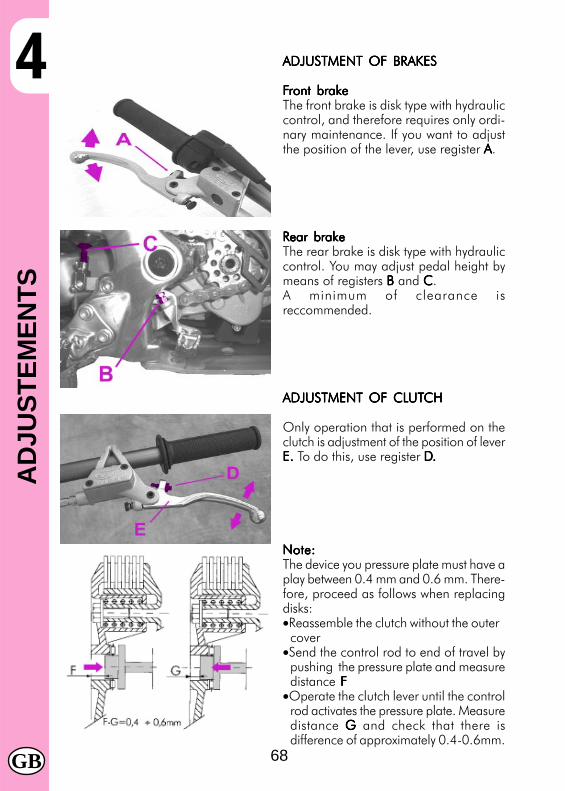
FFFFFront brakeront brakeront brakeront brakeront brakeThe front brake is disk type with hydrauliccontrol, and therefore requires only ordi-nary maintenance. If you want to adjustthe position of the lever, use register AAAAA.
RRRRRear brakeear brakeear brakeear brakeear brakeThe rear brake is disk type with hydrauliccontrol. You may adjust pedal height bymeans of registers BBBBB and CCCCC.A minimum of clearance isreccommended.
ADJUSTMENT OF CLADJUSTMENT OF CLADJUSTMENT OF CLADJUSTMENT OF CLADJUSTMENT OF CLUTUTUTUTUTCHCHCHCHCH
Only operation that is performed on theclutch is adjustment of the position of leverEEEEE..... To do this, use register DDDDD.....
Note:Note:Note:Note:Note:The device you pressure plate must have aplay between 0.4 mm and 0.6 mm. There-fore, proceed as follows when replacingdisks:•Reassemble the clutch without the outer cover•Send the control rod to end of travel bypushing the pressure plate and measuredistance F F F F F
•Operate the clutch lever until the controlrod activates the pressure plate. Measuredistance GGGGG and check that there isdifference of approximately 0.4-0.6mm.

69 GB
4
AD
JUST
EMEN
TS
ADJUSTMENT OF IDLING SPEEDADJUSTMENT OF IDLING SPEEDADJUSTMENT OF IDLING SPEEDADJUSTMENT OF IDLING SPEEDADJUSTMENT OF IDLING SPEEDIn order to correctly perform this operation, we advise you to do it when the engine ishot, connecting an electric revolution coun-ter to the spark plug wire. Use the registerA A A A A to calibrate the minimum (1000 rpm).
ADJUSTMENT OF GAS CLEARANCEADJUSTMENT OF GAS CLEARANCEADJUSTMENT OF GAS CLEARANCEADJUSTMENT OF GAS CLEARANCEADJUSTMENT OF GAS CLEARANCEWhenever the accelerator showsunloaded travel exceeding 3 mm,measured from the edge of the handle,you should adjust it by means ofcable gas register.
CHECK AND ADJUSTMENT OFCHECK AND ADJUSTMENT OFCHECK AND ADJUSTMENT OFCHECK AND ADJUSTMENT OFCHECK AND ADJUSTMENT OFSTEERING GEARSTEERING GEARSTEERING GEARSTEERING GEARSTEERING GEARPeriodically check the play in the steeringsleeve by moving the fork back and forthas shown in the figure. Whenever you feelplay, adjust as described below:•Remove the handlbar protection•Unscrew the 2 screws CCCCC•Remove handlebar DDDDD•Loosen nut EEEEE•Loosen the screws GGGGG•Take up the play by means of ring nut FFFFF.•Correct adjustement, in order to notleaving any play, should not cause diffi-culty or irregularity in turning the handelbar•Tighten the nut EEEEEFor reassembing proceed in the reverse or-der.
ADJUSTMENT AIRADJUSTMENT AIRADJUSTMENT AIRADJUSTMENT AIRADJUSTMENT AIRFrom all closed recommend to 1 1/2 turns(B).
70
AD
JUST
EMEN
TS
GB
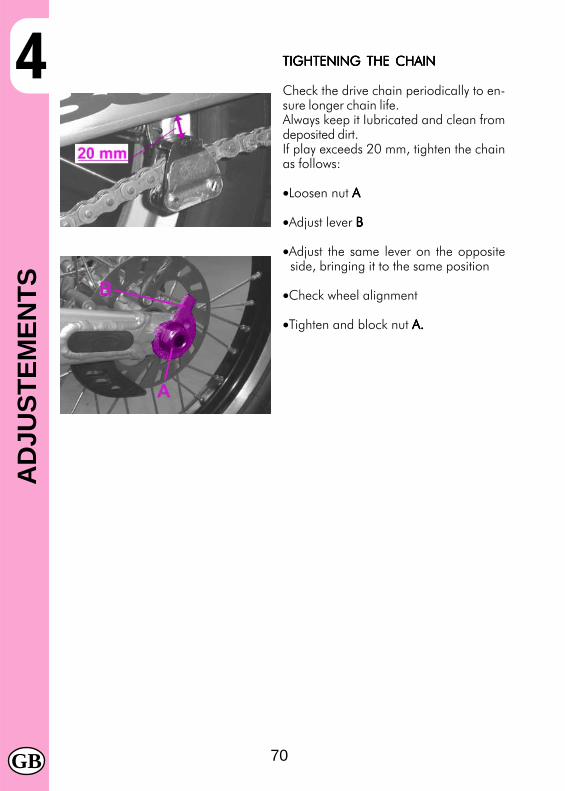
4 TIGHTENING THE CHAINTIGHTENING THE CHAINTIGHTENING THE CHAINTIGHTENING THE CHAINTIGHTENING THE CHAIN
Check the drive chain periodically to en-sure longer chain life.Always keep it Iubricated and clean fromdeposited dirt.If play exceeds 20 mm, tighten the chainas follows:
•Loosen nut AAAAA
•Adjust lever BBBBB
•Adjust the same lever on the oppositeside, bringing it to the same position
•Check wheel alignment
•Tighten and block nut A.A.A.A.A.

71 GB
4
AD
JUST
EMEN
TS
ADJUSTEMENT OF FRONTADJUSTEMENT OF FRONTADJUSTEMENT OF FRONTADJUSTEMENT OF FRONTADJUSTEMENT OF FRONTSUSPENSIONSUSPENSIONSUSPENSIONSUSPENSIONSUSPENSIONFFFFForkorkorkorkork•For a more active “quicker” suspensionsetting, totally unscrew regulation knobB B B B B compared to the std. position
•For a more controlled “slower”suspension setting, preload spring forabout 4-5 turns using the adjusting screwA A A A A and turning the knob B B B B B by 15 clicksfrom the fully opened position, which isin the middle of the adjustement.
•Rider weight. According to the rider weight,use the following settings:
THGIEWREDIR THGIEWREDIR THGIEWREDIR THGIEWREDIR THGIEWREDIR)gk(
GNIRPS GNIRPS GNIRPS GNIRPS GNIRPSDAOLERP
08>thgiewsnrut01+
mm801
08<thgiew<57snrut5+
mm011
07<thgiew0
mm211
In the event of any malfunction, contactIn the event of any malfunction, contactIn the event of any malfunction, contactIn the event of any malfunction, contactIn the event of any malfunction, contactour authorised customer serviceour authorised customer serviceour authorised customer serviceour authorised customer serviceour authorised customer servicenetwork.network.network.network.network.

72
AD
JUST
EMEN
TS
GB
4 ADJUSTMENT OF REAR SHOCKADJUSTMENT OF REAR SHOCKADJUSTMENT OF REAR SHOCKADJUSTMENT OF REAR SHOCKADJUSTMENT OF REAR SHOCKABSORBERABSORBERABSORBERABSORBERABSORBERAdjustment of spring IoadAdjustment of spring IoadAdjustment of spring IoadAdjustment of spring IoadAdjustment of spring Ioad
•For a more active “quicker” suspensionsetting, open compression regulationknob AAAAA
•For a more controlled “slower”suspension setting, close compressionregulation AAAAA
•Periodically clean the rebound rubber as follow: lower/remove rebound rubber using a little screwdriver and blow with compressedair in the spring spacer milling
•Always check the top and bottom bolts are tight.
In the event of any malfunction,In the event of any malfunction,In the event of any malfunction,In the event of any malfunction,In the event of any malfunction,contact our authorised customercontact our authorised customercontact our authorised customercontact our authorised customercontact our authorised customerservice network.service network.service network.service network.service network.

73
WH
AT T
O D
O IN
AN
EM
ERG
ENC
Y
GB
5
SE
CT
IO
N
5
INDEXINDEXINDEXINDEXINDEX
Troubleshooting
74
WH
AT T
O D
O IN
AN
EM
ERG
ENC
Y
GB
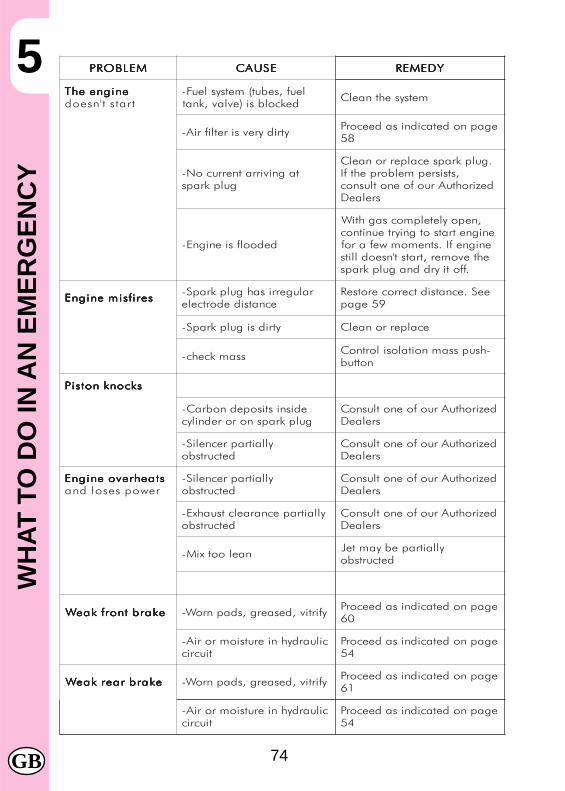
5 MELBORP MELBORP MELBORP MELBORP MELBORP ESUAC ESUAC ESUAC ESUAC ESUAC YDEMER YDEMER YDEMER YDEMER YDEMER
enigneehT enigneehT enigneehT enigneehT enigneehTtratst'nseod
leuf,sebut(metsysleuF-dekcolbsi)evlav,knat metsysehtnaelC
ytridyrevsiretlifriA- egapnodetacidnisadeecorP85
tagnivirratnerrucoN-gulpkraps
.gulpkrapsecalperronaelC,stsisrepmelborpehtfI
dezirohtuAruofoenotlusnocsrelaeD
dedoolfsienignE-
,nepoyletelpmocsaghtiWenignetratsotgniyrteunitnocenignefI.stnemomwefarofehtevomer,tratst'nseodllits
.ffotiyrddnagulpkraps
serifsimenignE serifsimenignE serifsimenignE serifsimenignE serifsimenignE ralugerrisahgulpkrapS-ecnatsidedortcele
eeS.ecnatsidtcerrocerotseR95egap
ytridsigulpkrapS- ecalperronaelC
ssamkcehc- -hsupssamnoitalosilortnoCnottub
skconknotsiP skconknotsiP skconknotsiP skconknotsiP skconknotsiP
edisnistisopednobraC-gulpkrapsnororednilyc
dezirohtuAruofoenotlusnoCsrelaeD
yllaitraprecneliS-detcurtsbo
dezirohtuAruofoenotlusnoCsrelaeD
staehrevoenignE staehrevoenignE staehrevoenignE staehrevoenignE staehrevoenignErewopsesoldna
yllaitraprecneliS-detcurtsbo
dezirohtuAruofoenotlusnoCsrelaeD
yllaitrapecnaraelctsuahxE-detcurtsbo
dezirohtuAruofoenotlusnoCsrelaeD
naelootxiM- yllaitrapebyamteJdetcurtsbo
ekarbtnorfkaeW ekarbtnorfkaeW ekarbtnorfkaeW ekarbtnorfkaeW ekarbtnorfkaeW yfirtiv,desaerg,sdapnroW- egapnodetacidnisadeecorP06
ciluardyhnierutsiomroriA-tiucric
egapnodetacidnisadeecorP45
ekarbraerkaeW ekarbraerkaeW ekarbraerkaeW ekarbraerkaeW ekarbraerkaeW yfirtiv,desaerg,sdapnroW- egapnodetacidnisadeecorP16
ciluardyhnierutsiomroriA-tiucric
egapnodetacidnisadeecorP45

75
ALP
HA
BET
ICA
L IN
DEX
GB
Adjustment of brakes ............................................................................. 68Adjustment of clutch ............................................................................... 68Adjustment of front suspension .............................................................. 71Adjustment of rear shock absorber ........................................................... 72Adjustment air ...................................................................................69Adjustment of gas clearance ................................................................. 69Adjustment of idling speed ...................................................................... 69Air filter ............................................................................................ 58
Bleeding of brakes .................................................................................... 54Bleeding of clutch .................................................................................... 55Brakes: front brake check and replacement ......................................... 60Brakes: rear brake check and replacement ................................................... 61Breaking in .............................................................................................. 49
Carburetor ............................................................................................... 63Checks after cleaning ...................................................................... 65Checks and maintenance before and after off-road use ................................. 48
Electical diagram ...................................................................... 46
Fueling ................................................................................. 48
Generator ..............................................................................................59
Instrument panel and controls ...................................................... 44
Liquid coolant ...................................................................................... 62Lubricants and liquids ................................................................... 49
Main parts ........................................................................................... 44Maintenance schedule ................................................................... 66
Oil gearbox: check and change ............................................ 52Oil brake pump ........................................................................... 53Oil clutch pump .......................................................................... 55Oil fork: right shaft .............................................................. 56Oil fork: left shaft .............................................................................. 57
Rear shock absorber leverage................................................................... 64
Silencer ............................................................................................ 62Spark plug ......................................................................... 59Startup .......................................................................................... 50Steering gear: check and adjustment ................................................... 69
Technical data ............................................................................ 45Tightening the chain ..................................................................... 70Troubleshooting ................................................................................... 74
Valve petals ................................................................. 63Vehicle identification data: motor and frame identification .............................. 44

76GB
NOTES
.. . . . . . . . . . . . . . . . . . . . . . . . . . . . . . . . . . . . . . . . . . . . . . . . . . . . . . . . . . . . . . . . . . . . . . . . . . . . . . . . . . . . . . . . . . . . . . . . .
. . . . . . . . . . . . . . . . . . . . . . . . . . . . . . . . . . . . . . . . . . . . . . . . . . . . . . . . . . . . . . . . . . . . . . . . . . . . . . . . . . . . . . . . . . . . . . . . . .
. . . . . . . . . . . . . . . . . . . . . . . . . . . . . . . . . . . . . . . . . . . . . . . . . . . . . . . . . . . . . . . . . . . . . . . . . . . . . . . . . . . . . . . . . . . . . . . . . .
. . . . . . . . . . . . . . . . . . . . . . . . . . . . . . . . . . . . . . . . . . . . . . . . . . . . . . . . . . . . . . . . . . . . . . . . . . . . . . . . . . . . . . . . . . . . . . . . . .
. . . . . . . . . . . . . . . . . . . . . . . . . . . . . . . . . . . . . . . . . . . . . . . . . . . . . . . . . . . . . . . . . . . . . . . . . . . . . . . . . . . . . . . . . . . . . . . . . .
. . . . . . . . . . . . . . . . . . . . . . . . . . . . . . . . . . . . . . . . . . . . . . . . . . . . . . . . . . . . . . . . . . . . . . . . . . . . . . . . . . . . . . . . . . . . . . . . . .
. . . . . . . . . . . . . . . . . . . . . . . . . . . . . . . . . . . . . . . . . . . . . . . . . . . . . . . . . . . . . . . . . . . . . . . . . . . . . . . . . . . . . . . . . . . . . . . . . .
. . . . . . . . . . . . . . . . . . . . . . . . . . . . . . . . . . . . . . . . . . . . . . . . . . . . . . . . . . . . . . . . . . . . . . . . . . . . . . . . . . . . . . . . . . . . . . . . . .
. . . . . . . . . . . . . . . . . . . . . . . . . . . . . . . . . . . . . . . . . . . . . . . . . . . . . . . . . . . . . . . . . . . . . . . . . . . . . . . . . . . . . . . . . . . . . . . . . .
. . . . . . . . . . . . . . . . . . . . . . . . . . . . . . . . . . . . . . . . . . . . . . . . . . . . . . . . . . . . . . . . . . . . . . . . . . . . . . . . . . . . . . . . . . . . . . . . . .
. . . . . . . . . . . . . . . . . . . . . . . . . . . . . . . . . . . . . . . . . . . . . . . . . . . . . . . . . . . . . . . . . . . . . . . . . . . . . . . . . . . . . . . . . . . . . . . . . .
. . . . . . . . . . . . . . . . . . . . . . . . . . . . . . . . . . . . . . . . . . . . . . . . . . . . . . . . . . . . . . . . . . . . . . . . . . . . . . . . . . . . . . . . . . . . . . . . . .
. . . . . . . . . . . . . . . . . . . . . . . . . . . . . . . . . . . . . . . . . . . . . . . . . . . . . . . . . . . . . . . . . . . . . . . . . . . . . . . . . . . . . . . . . . . . . . . . . .
. . . . . . . . . . . . . . . . . . . . . . . . . . . . . . . . . . . . . . . . . . . . . . . . . . . . . . . . . . . . . . . . . . . . . . . . . . . . . . . . . . . . . . . . . . . . . . . . . .
. . . . . . . . . . . . . . . . . . . . . . . . . . . . . . . . . . . . . . . . . . . . . . . . . . . . . . . . . . . . . . . . . . . . . . . . . . . . . . . . . . . . . . . . . . . . . . . . . .
. . . . . . . . . . . . . . . . . . . . . . . . . . . . . . . . . . . . . . . . . . . . . . . . . . . . . . . . . . . . . . . . . . . . . . . . . . . . . . . . . . . . . . . . . . . . . . . . . .
. . . . . . . . . . . . . . . . . . . . . . . . . . . . . . . . . . . . . . . . . . . . . . . . . . . . . . . . . . . . . . . . . . . . . . . . . . . . . . . . . . . . . . . . . . . . . . . . . .
. . . . . . . . . . . . . . . . . . . . . . . . . . . . . . . . . . . . . . . . . . . . . . . . . . . . . . . . . . . . . . . . . . . . . . . . . . . . . . . . . . . . . . . . . . . . . . . . . .
. . . . . . . . . . . . . . . . . . . . . . . . . . . . . . . . . . . . . . . . . . . . . . . . . . . . . . . . . . . . . . . . . . . . . . . . . . . . . . . . . . . . . . . . . . . . . . . . . .
. . . . . . . . . . . . . . . . . . . . . . . . . . . . . . . . . . . . . . . . . . . . . . . . . . . . . . . . . . . . . . . . . . . . . . . . . . . . . . . . . . . . . . . . . . . . . . . . . .
. . . . . . . . . . . . . . . . . . . . . . . . . . . . . . . . . . . . . . . . . . . . . . . . . . . . . . . . . . . . . . . . . . . . . . . . . . . . . . . . . . . . . . . . . . . . . . . . . .
. . . . . . . . . . . . . . . . . . . . . . . . . . . . . . . . . . . . . . . . . . . . . . . . . . . . . . . . . . . . . . . . . . . . . . . . . . . . . . . . . . . . . . . . . . . . . . . . . .
. . . . . . . . . . . . . . . . . . . . . . . . . . . . . . . . . . . . . . . . . . . . . . . . . . . . . . . . . . . . . . . . . . . . . . . . . . . . . . . . . . . . . . . . . . . . . . . . . .
. . . . . . . . . . . . . . . . . . . . . . . . . . . . . . . . . . . . . . . . . . . . . . . . . . . . . . . . . . . . . . . . . . . . . . . . . . . . . . . . . . . . . . . . . . . . . . . . . .
. . . . . . . . . . . . . . . . . . . . . . . . . . . . . . . . . . . . . . . . . . . . . . . . . . . . . . . . . . . . . . . . . . . . . . . . . . . . . . . . . . . . . . . . . . . . . . . . . .
. . . . . . . . . . . . . . . . . . . . . . . . . . . . . . . . . . . . . . . . . . . . . . . . . . . . . . . . . . . . . . . . . . . . . . . . . . . . . . . . . . . . . . . . . . . . . . . . . .
. . . . . . . . . . . . . . . . . . . . . . . . . . . . . . . . . . . . . . . . . . . . . . . . . . . . . . . . . . . . . . . . . . . . . . . . . . . . . . . . . . . . . . . . . . . . . . . . . .
. . . . . . . . . . . . . . . . . . . . . . . . . . . . . . . . . . . . . . . . . . . . . . . . . . . . . . . . . . . . . . . . . . . . . . . . . . . . . . . . . . . . . . . . . . . . . . . . . .
. . . . . . . . . . . . . . . . . . . . . . . . . . . . . . . . . . . . . . . . . . . . . . . . . . . . . . . . . . . . . . . . . . . . . . . . . . . . . . . . . . . . . . . . . . . . . . . . . .
. . . . . . . . . . . . . . . . . . . . . . . . . . . . . . . . . . . . . . . . . . . . . . . . . . . . . . . . . . . . . . . . . . . . . . . . . . . . . . . . . . . . . . . . . . . . . . . . . .
. . . . . . . . . . . . . . . . . . . . . . . . . . . . . . . . . . . . . . . . . . . . . . . . . . . . . . . . . . . . . . . . . . . . . . . . . . . . . . . . . . . . . . . . . . . . . . . . . .
. . . . . . . . . . . . . . . . . . . . . . . . . . . . . . . . . . . . . . . . . . . . . . . . . . . . . . . . . . . . . . . . . . . . . . . . . . . . . . . . . . . . . . . . . . . . . . . . . .
. . . . . . . . . . . . . . . . . . . . . . . . . . . . . . . . . . . . . . . . . . . . . . . . . . . . . . . . . . . . . . . . . . . . . . . . . . . . . . . . . . . . . . . . . . . . . . . . . .
. . . . . . . . . . . . . . . . . . . . . . . . . . . . . . . . . . . . . . . . . . . . . . . . . . . . . . . . . . . . . . . . . . . . . . . . . . . . . . . . . . . . . . . . . . . . . . . . . .
. . . . . . . . . . . . . . . . . . . . . . . . . . . . . . . . . . . . . . . . . . . . . . . . . . . . . . . . . . . . . . . . . . . . . . . . . . . . . . . . . . . . . . . . . . . . . . . . . .
. . . . . . . . . . . . . . . . . . . . . . . . . . . . . . . . . . . . . . . . . . . . . . . . . . . . . . . . . . . . . . . . . . . . . . . . . . . . . . . . . . . . . . . . . . . . . . . . . . . .

Betamotor S.p.A.Betamotor S.p.A.Betamotor S.p.A.Betamotor S.p.A.Betamotor S.p.A.Pian dell’Isola, 72 - 50067 Rignano sull’Arno - Firenze - ItaliaTel. +39. 055. 83 48 741 R.A - Fax +39. 055. 83 48 984wwwwwwwwwwwwwww.betamotor.betamotor.betamotor.betamotor.betamotor.com .com .com .com .com - info@betamotorinfo@betamotorinfo@betamotorinfo@[email protected]
Cod
. 007
4550
10 0
00Li
bret
to re
aliz
zato
da
ENSE
CO
s.r.
l. - I
NG
EGN
ERIA
E S
ERVI
ZI T
ECN
ICI (
FI)